Are you ready to embark on a captivating journey into the world of cyanotype printing? This unique art form combines science and creativity, allowing you to produce stunning blue prints. In this blog post, we will uncover the fascinating history and chemistry behind cyanotype printing, explore essential tools and materials, and provide step-by-step guidance for creating your own cyanotype masterpieces. Let your imagination run wild as we dive into this mesmerizing world!
Table of Contents
Key Takeaways
Explore the art and science of cyanotype printing, an early photographic process popularized by Anna Atkins in 1842.
Utilize essential tools and materials to prepare a surface, design compositions with objects, expose & develop prints for unique colors & tones.
Preserve prints through proper care techniques such as washing in cold water away from direct sunlight for maximum longevity.
The Art and Science of Cyanotype Printing
Cyanotype printing is a fascinating fusion of art and science, originating in the 19th century. This one-of-a-kind process involves the use of UV-sensitive cyanotype chemicals, such as ferric ammonium citrate and potassium ferricyanide, to create mesmerizing blue prints known as cyanotypes. One of the oldest photographic printing processes, cyanotype printing captures the beauty of nature and the intricacy of man-made objects in a strikingly unique way.
The chemistry is the secret behind the magic of cyanotype printing. When exposed to UV light, a chemical reaction occurs between the ferric ammonium citrate and potassium ferricyanide, producing the characteristic Prussian blue pigment. This captivating process allows you to create stunning cyanotype prints that capture the essence of your chosen subject, be it a delicate flower, a piece of lace, or an architectural drawing.
The Origins of Cyanotype Photography
The history of cyanotype photography dates back to 1842, when the talented Sir John Herschel invented this remarkable process. Herschel’s innovation would soon be embraced by the pioneering woman photographer Anna Atkins, who utilized cyanotype printing to create her groundbreaking photo book, “Photographs of British Algae: Cyanotype Impressions”. Atkins’ work focused on the intricacy of British algae, showcasing the astonishing level of detail that could be achieved through cyanotype printing.
The simplicity, affordability, and resilience of cyanotype printing quickly made it a popular method, especially when compared to silver-based techniques. The process became widely used for reproducing engineering and architectural drawings, eventually giving rise to the term “blueprint”. Today, cyanotype printing continues to captivate artists and photographers alike, offering a unique and accessible means of creating visually striking images.
The Chemistry Behind Cyanotypes
A fascinating chemical reaction is the cornerstone of cyanotype printing. When exposed to sunlight, the light-sensitive chemicals in the cyanotype emulsion, potassium ferricyanide, and ferric ammonium citrate, undergo a reduction reaction. This results in the formation of Prussian blue, the striking pigment that gives cyanotype prints their characteristic hue.
Initiation of this chemical reaction significantly depends on exposure to sunlight. The areas of the cyanotype emulsion exposed to UV light become blue, while the areas covered by objects or photographic negatives remain white.
This captivating interplay of light and chemistry allows you to create intricate, detailed cyanotype prints that capture the beauty of your chosen subject matter.
Essential Tools and Materials for Cyanotype Printing

Embarking on your cyanotype printing journey necessitates a few essential tools and materials:
Chemicals: potassium ferricyanide and ferric ammonium citrate are the two crucial chemicals required for cyanotype printing. You can purchase these chemicals from various online retailers or specialized suppliers.
Paper or fabric: choose a high-quality paper or fabric that is suitable for cyanotype printing.
Brushes: use brushes to apply the chemicals onto the paper or fabric.
Glass or acrylic sheets: these are used to hold the paper or fabric in place during the exposure process.
Protective gear: wear gloves and protective clothing to ensure your safety while handling the chemicals.
When it comes to selecting the right paper or fabric for your cyanotype prints, there are a few guidelines to follow. For paper, it is recommended to use a minimum of 100GSM, with cartridge paper being the most popular choice. Watercolor paper is also suitable, and experimenting with different types can yield varied results. For fabric, 100% unbleached cotton, commonly known as calico, is the ideal choice.
To apply the cyanotype solution to your chosen surface, you’ll need a foam sponge brush. Wearing gloves and an apron, as well as protecting your work surface with newspaper or cardboard, will help safeguard your skin and clothing from staining. Remember that the cyanotype solution is light-sensitive, so it’s essential to mix it in a dark setting and keep it in the dark until you’re ready to use it.
Preparing Your Cyanotype Surface
Cyanotype surface preparation is a vital step in the printing process. First, consider the type of paper or fabric you’ll use for your prints. As mentioned earlier, cartridge paper or watercolor paper works well for paper prints, while unbleached cotton is ideal for fabric prints. Different types of paper can produce varied results, so don’t be afraid to experiment.
Next, you’ll need to mix and apply the cyanotype solution to your chosen surface. Here’s how:
Combine the potassium ferricyanide and ferric ammonium citrate with water, mixing them thoroughly.
Apply the mixed solution to your paper or fabric using a foam sponge brush.
Follow safety precautions like wearing gloves and working in a dark environment.
Allow the cyanotype solution to dry on your surface for at least 24 hours before proceeding with the printing process. To create a dark environment for the application of the light sensitive solution, you can cover windows and light sources with red cellophane to block UV rays. Remember that the cyanotype solution is light-sensitive, so it’s essential to keep it in the dark until you’re ready to use it.
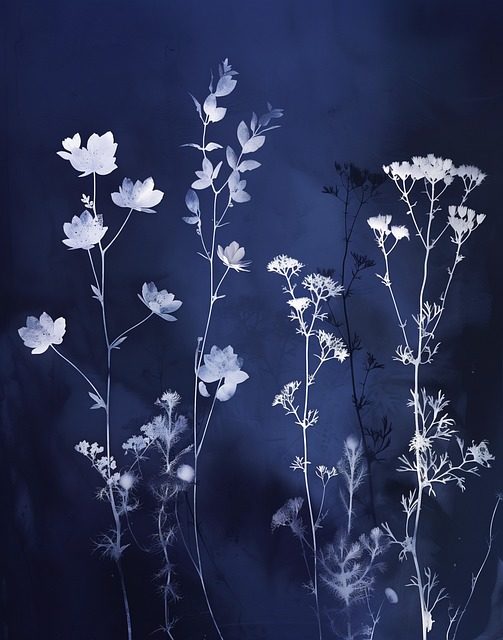
Designing and Arranging Your Cyanotype Composition
The creative possibilities in cyanotype printing are virtually limitless. You can use a wide variety of objects for your cyanotype compositions, such as:
plants
lace
fabric
everyday items like keys or buttons
The key to achieving clear and sharp prints is ensuring good contact between the objects and the surface.
Photograms are a popular choice for cyanotype compositions. A photogram is a print made by placing objects directly onto a photosensitive surface and exposing it to light. In cyanotype printing, this approach allows you to create detailed images of your objects, capturing their intricate textures and forms.
To achieve the best results, try experimenting with different arrangements and materials for your cyanotype compositions. For example, you might combine natural elements such as leaves and feathers with man-made objects like lace or cut paper. By playing with scale, repetition, and layering, you’ll be able to create unique, visually captivating cyanotype prints that showcase your artistic vision.
Exposing and Developing Your Cyanotype Print
After designing and arranging your cyanotype composition, proceed to expose and develop your print. Here are the steps to follow:
Place your cyanotype paper or fabric in direct sunlight or under a UV lamp.
The exposure time will vary depending on the intensity of the UV light; on a bright sunny day, it may take only 2-5 minutes.
Be sure to monitor the exposure carefully, as overexposure can lead to a loss of detail in the final print.
After exposing your print, it’s time to develop the image. Here’s how:
Rinse the print in cold running water for a few minutes to fix the image and wash away any unreacted chemicals.
The areas of the print that were exposed to sunlight will turn a deep Prussian blue.
The areas covered by your objects or photographic negatives will remain white.
Finally, allow your cyanotype print to dry completely. You can hang the print to dry on a washing line to ensure even drying and prevent it from sticking to any surfaces below. Once dry, you’ll be able to admire your one-of-a-kind cyanotype masterpiece!
Experimenting with Cyanotype Colors and Tones
The classic Prussian blue hue isn’t the only option in cyanotype printing. By experimenting with different techniques, you can achieve a wide range of colors and tones in your cyanotype prints. One such technique is wet cyanotypes, which involve remoistening the prepared paper or surface with a spray mister or working directly into the wet chemical solution. By incorporating elements like:
soap bubbles
salt
paprika
turmeric
you can create unique cyan blue print variations that stand out from the traditional Prussian blue.
You can create intriguing effects and reactions in your prints.
Another technique for altering the colors and tones of your cyanotype prints is toning. Toning involves adding substances like wine, coffee, or tea to stain or ‘color’ the print, resulting in unique and visually striking effects. Experimenting with different toners can yield a range of colors, from warm sepia tones to cool grays.
Specialty chemicals, such as Jacquard Solarfast dyes, can also be used to create cyanotype prints in a variety of colors. These dyes are available for use on both paper and fabric and come in a selection of colors. The Jacquard Solarfast Starter set, for example, includes everything you need to create:
violet prints
orange prints
blue prints
inverted images
photographs
By exploring these advanced techniques, you’ll open up a world of creative possibilities for your cyanotype prints.
Creating Photographic Negatives for Cyanotype Printing
Photographic negatives are needed to create photographic images in your cyanotype prints. There are two main methods for creating photographic negatives for cyanotype printing: using film negatives or inverting black and white images and printing them on acetate sheets.
To create a negative from a black and white image, follow these steps:
Open the image in your preferred editing software and convert it to black and white.
Invert the colors of the image.
Save the inverted image.
You can use this inverted image as a negative for cyanotype printing, placing it directly onto your prepared paper or fabric.
If you prefer to work with film negatives, you can create a digital negative by printing a reversed image onto an overhead transparency film. Here’s how:
Place the film negative onto your cyanotype paper, ensuring good contact between the negative and the paper.
Expose the paper to UV light or sunlight, as you would for a standard cyanotype print.
The chemicals used in the cyanotype process will not damage the film negative, so you can reuse it for multiple prints.
Caring for and Preserving Your Cyanotype Prints
Ensuring the longevity and lasting beauty of your cyanotype prints requires proper care and preservation. For cyanotype prints on fabric, it’s essential to wash them in cold water to remove any residual chemicals and prevent color fading. When drying your prints, hang them on a washing line or lay them flat to dry, ensuring they don’t stick to any surfaces below.
To preserve your cyanotype prints, follow these steps:
Store them in a cool, dry place away from direct sunlight, which can cause fading over time.
If your prints begin to fade, you can sometimes regenerate them by remoisturizing the print.
In some cases, you can immerse the prints in hydrogen peroxide or vinegar to restore their vibrancy.
However, these methods are not always guaranteed to work, so it’s best to take preventative measures to ensure your prints remain vibrant and beautiful.
Finally, be mindful of the materials you use to frame or display your cyanotype prints. Acid-free mats and UV-filtering glass can help protect your prints from fading and discoloration over time. By taking proper care of your cyanotype prints, you can ensure they remain a cherished part of your art collection for years to come.
Advanced Techniques and Creative Ideas for Cyanotype Printing
As your proficiency in cyanotype printing increases, consider exploring advanced techniques and creative ideas to broaden your artistic repertoire. Experimenting with natural elements like leaves, twigs, or sand can add texture and depth to your cyanotype prints, while incorporating unconventional materials like lace or cut paper can create intriguing visual effects.
One advanced technique to explore is sgraffito, a process typically employed in ceramics and other forms of art where layers of distinct hued materials are scraped away to reveal the layers underneath. Although not directly applicable to cyanotype printing, the concept of sgraffito can inspire you to play with layering and texture in your cyanotype compositions, creating complex and visually engaging prints.
Another creative idea to consider is incorporating Shibori tie-dye techniques into your cyanotype printing process. Shibori is a traditional Japanese dyeing technique that involves folding, twisting, or binding fabric before dyeing it to produce distinctive patterns. By integrating Shibori patterns into your cyanotype process, you can create intricate and textured prints that showcase your artistic vision.
Check out 20 of the best cyanotype ideas.
Summary
In conclusion, cyanotype printing offers a unique and accessible way to create stunning, one-of-a-kind prints that blend science and creativity. Whether you’re a beginner or an experienced artist, cyanotype printing provides endless opportunities to experiment with different materials, techniques, and subjects. By following the guidance provided in this blog post, you’ll be well on your way to mastering this captivating art form and creating your own striking cyanotype masterpieces.
Frequently Asked Questions
How toxic is cyanotype?
Cyanotype is generally non-toxic and does not present any significant health risk, but proper precautions should be taken when handling the chemicals and fabrics.
Can I do a cyanotype print at home?
Yes, you can do a cyanotype print at home with special materials and some mixing, coating, printing and washing steps.
What is cyanotype art?
Cyanotype art is a photographic printing process which involves coating a surface with a 1:1 solution of Potassium Ferricyanide and Ammonium Ferric (III) Citrate, then exposing it to UV light and washing with water to create stunning white and Prussian blue images.
What chemicals are in a cyanotype?
The cyanotype is composed of two solutions, ferric ammonium citrate/oxalate and potassium ferricyanide, mixed with water. The result is a cyan-blue print that can be used for art, monochrome imagery, and reprography as blueprints.
How does cyanotype work?
Cyanotype photography is a camera-less technique which involves exposing objects or photo negatives onto paper coated with a solution of iron salts to UV light. This causes the paper to turn Prussian blue around the objects while the parts blocked by the object remain white, creating stunning images.


